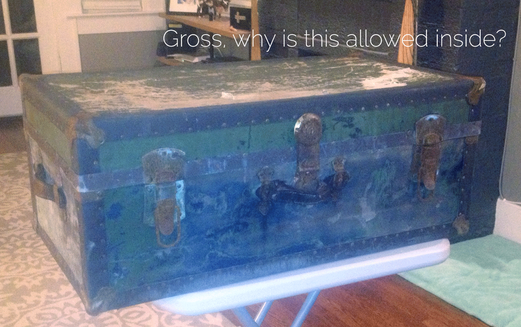
Once upon a time last spring Jay and I went to this cool salvage store/house in midtown Houston called Adkins Architectural Antiques. Inside is a lot of dirty old stuff, but once you get past the main rooms and wander into the back you find even dirtier older stuff. The attic of the bajillion year old house is where they put all the stuff that no one could ever possibly want ever (other peoples plastic trophies, a MacDonald's sign), and that's where we found this sad little trunk.
You know how Jay spent all that time building me a really cool vanity table? Yeah I went and made it a littleeee bit too blue. Maybe, possibly, way too blue. I mean I wouldn't say it was smurf but it wasn't quite the deep moody cobalt I had envisioned. I'll let you take a look at it yourself. I know. I wasn't thinking. Actually I was fully aware of the fact that this wasn't the color I wanted about 30 seconds into painting: But I soldiered on in hopes it would dry into the imaginary fabulous cobalt color in my brain. It didn't. Unfortunately I chose to paint the very blue blue about a week before my medicine shelf exam, so I didn't have time to run out and fix my mistake right away. This was a good thing in the end for two reasons: One, because I realized that it wasn't so much that I had bought the wrong blue as that bold color just wasn't a good look with the rest of our bedroom. Two, because my Mom and Dad drove in to town to visit me (yay!) and Mom was able to help me figure out a more sensible shade. Before the too blue happened, primer happened. I bought all the paint for this project at Sherwin Williams. They tinted my primer a medium gray color so it wouldn't pop through the darker paint I planned to put on top. Then I used glossy latex in "Blueblood" for the super blue. I chose to get the low VOC ones because I knew I would be painting indoors and I chose latex over oil because it takes 2-3 weeks (yes weeks) to get oil paint to dry in our humidity down here. Ain't nobody got time fo that. Plus I just don't like the texture and the brush strokes I get when I paint with oil based, and I love the quick clean-up that comes with latex. I am well aware that this is a point of controversy in painting. Use what works best for you! So with paint expert (Mom) in tow I headed back to Sherwin Williams to beg the paint Gods for mercy. Luckily for me Betsey the master-paint-mixer was working, and instead of having to buy a whole other $22 quart of paint she was able to tint my "Blueblood," into the new blue we picked out called "Indigo Batik." It's a more muted and more purple blue shade. All that was left to do was put (yet another) two coats of paint on the whole vanity. Mom recommended the velour rollers because they leave such a nice smooth finish. You can see her using one in the pic below while I tackle a leg with my handy dandy Purdy brush. Hooray for painting helpers. My Mom's get-projects-done-now motivation is always impressive. In the end it turned out gorgeous. A nice sleek navy with a high gloss finish. I waited 3 or 4 days for the paint to dry before covering the whole thing with a few coats of Minwax Polycrylic high gloss to protect the finish and bump up the shine factor. Here's the finished product! For the knob I found this cool mercury glass one at Anthropologie that I think adds a nice dose of sparkle without getting insanely girly. For a little unexpected kick I did the inside in Sherwin Williams "Exuberant Pink." I just bought a sample to use to save some $$ which resulted in about a thousand coats to get a clean finish. I wouldn't recommend this for a surface that's getting used a ton, but I covered it in the polycrylic and a drawer liner, so here's hoping that it holds up. I spent a few days trying to decide on a mirror when I found this cute one at Target for $20! Score! Especially considering the cheapest options at the local antiques shops were $50+ and horrible. The mercury glass lamp and shade are also from Target and the makeup mirror is a Conair one from a hundred years ago. Here she is all dressed up. I'm so pleased with how the project turned out, even if it was an epically long one. Hope we didn't bore you with the details, and I hope we've inspired you to take on a project or two. Oh, and when in doubt about a paint color, ask your mom :)
I guess Margo has given you the basic idea of the vanity remodel project, but I think I’ll give a brief synopsis up through the assembly so we are all on the same page. Sorry if this post sounds less like Elle Woods from Legally Blonde wrote it than you are used to. The original table was about 25.5 inches tall which was too short and also the sides of the table were only about 3 inches tall at the smallest point, which is far too shallow for a drawer. The depth and length were perfect at 24 inches wide by 19 inches deep. With that in mind I drew this plan to modify the table: as you can see, the drawing is of the front of the table showing the original legs plus the extension and the front panel with the opening for the drawer. The back is identical to the front except for its a solid board and the sides are the same except only 16 inches long instead of 21. The legs needed an extension of 5.5 inches to make the total height 31 inches. The sides I enlarged to 8 inches high to give room for large drawer depth of 4 inches. So this means I needed 2 boards that are 8” x 16” for the sides and 1 board that is 8” x 21” for the back. The front was more difficult as it would be made of 4 smaller pieces glued together to make the opening for the drawer. As you can see in the drawing, I needed 2 boards 1.75” x 21” and two boards 1.75” x 4.5”. I went to Rockler to buy the lumber, as they had various sized pieces of .75” thick poplar on sale that day. I used the table saw to rip the boards to the proper width and the miter saw to cut them to the needed length. So all laid out together it looks something like this: Margo has already posted about the leg extensions assembly you can read it here. My suggestion is get legs the correct length already and save yourself the annoyance of the extensions. I should probably apologize to the original builder of the table, “I was angry that you didn’t feel the need to make all the legs the same width or keep them square, but I shouldn’t have referred to your mother like that or insinuated that she was unfaithful to your father. My bad.” So assembly time! The first step was to glue the front panel together to make the outer dimensions 8” by 21” and the drawer opening 17.5” by 4.5”. Just glue the ends of the wood that will be touching and clamp the heck out of it to be sure they stay aligned properly. Something like this: Now I get to use the Kreg Jig to make pocket holes. I put three pocket holes per edge that would form a joint: Just clamp the board into the jig, drill the pocket hole and screw it together! Don’t forget to drill pocket holes on the inside top edge of the sides to use with the top, its easier to do now than after its assembled. With drilling complete its assembly time. Be extra vigilant to ensure all the joints are 90 degrees as you put it together. The pocket holes really are nice, making the pieces go together with ease. I built a jig to hold the pieces tightly in position as I screwed them together: All assembled it should look like this: Now for the drawer install. Margo already blogged about building the drawer, so the only thing left is to install the supports and the tracks. The supports were scrap pieces of the lumber that were 3.5” by 18”. First I drilled pocket holes in the boards then screwed them right at the edge of the opening for the drawer. I then installed the drawer track by following the instructions in the package. Pretty straight forward but take your time and get it even to be sure both supports match exactly when you are through: Now fit the drawer into the opening and mark on the outside of the drawer the location of the slides on the supports. Be sure to leave a gap between the bottom of the drawer and the vanity so the drawer can move freely; I used a couple of nickels placed between the two as a spacer. Screw the slides to the drawer between the marks, put the slides together and presto: I routed the edges of the drawer face with a round over bit to make the edge sleeker (really this was just to justify the purchase of a router). I then measured carefully to be sure the drawer face was perfectly centered on the front of the vanity; its better to be perfectly centered on the vanity then on the drawer because that is the first thing you see: Now all we have left is screwing the top on: If you did the pocket holes at the beginning its super easy. I did buy a couple of corner braces from Rockler to use behind the front face since you can't drill a pocket hole in a 1.75” wide piece. That completes my part of the vanity rebuild, now I'll leave it up to Margo to pick (and most importantly) to apply the paint.
|